If you use PHPP and are not already using Warm’s excellent ‘plugin’ spreadsheet, (available for free, PHPP Warm Results Sheet v6.03) then you really should be. At Greengauge, we use PHPP on a daily basis to evaluate the performance of almost all the projects we are involved with, whether they aspire to Passivhaus Certification or not. We love the Warm summary sheet and find it amazingly useful for both ‘sanity checking’ our inputs, and optimising building designs. Here are our top five pro-tips for getting the most out of the sheet:
1. Quickly check your HLFF
Heat Loss Form Factor is really important in the design of efficient buildings. Not only is it shown clearly, but its broken down into floor, walls, and roofs. This is a great sanity check – if you’re a long way out then maybe you have a typo, or used the wrong scale when measuring up? You can also use it as a target design criteria – e.g. adding the dormer means we should reduce ground floor ceiling heights by X mm to avoid hurting the HLFF.
2. Rapidly identify input problems
Make sure there is a sensible number against each heatloss area/factor – did you forget to put a 1 in the quantities column for all your floors? Have you got a reasonable allowance in for thermal bridging? With some experience, you will be able to quickly identify things that don’t look right, and precisely target your error-checking. Even rookies will be able to pick up a lot – we recently looked at a PHPP where the windows were causing 20 or more times the heat loss and solar gain than we expected. The glass properties and the dimensions were all fine, but the quantities ran from 1 in the first row, 2 in the second, all the way down to 38 units of the 38th window type…
3. A quick solar overheating risk assessment
As a rule of thumb, Solar gains should be limited to about one-third of the total winter heat gains, or about 10 kWh/m2p.a., or no more than 15 kWh/m2p.a. Straying outside these limits doesn’t automatically mean you have an overheating risk, but it is a warning indicator. If you’re outside these thresholds, change your design or look carefully at overheating risk, or both. Also don’t forget to check the Diurnal temperature swing in the “Summer” sheet (not currently on the Warm summary), this should be less than 3°K for optimal comfort.
4. Optimise window design fast
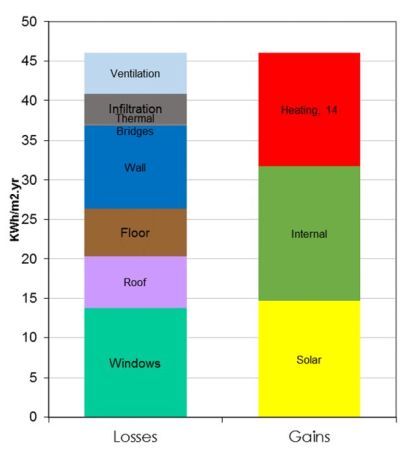
In a well-designed low energy house, you can expect the window heat losses to be a similar level to, or preferably slightly less than the window solar gains. This info is broken down further If the total losses are significantly more than the gains, this suggests one of the following:
a. Input error
b. Too many, too small – if your casements are small (less than 600mm say), or skinny in either direction, your Frame factor will be poor – meaning that you have a relatively large amount of frame compared to the amount of glass. Consider re-designing your windows to have fewer casements with larger dimensions.
c. The frame factor is also surprisingly strongly affected by the width of the frame selected, so you might want to consider alternative, slimmer windows.
d. Orientation should not be the driving force behind a low-energy house, but it does still matter. You might want to consider changing orientation, but you might be better off making up for it elsewhere.
e. Optimise glass specification – sometimes it is possible to specify units with a higher G-value on the South to increase solar gains, while minimising the impact on heat losses. This doesn’t always work however, and remember you should avoid ‘maxing out’ your solar gains just to hit the ‘magic 15’ kWh/m2p.a.
5. Instantly see your low-hanging fruit
If you are aiming for a specific target such as Passivhaus, Enerphit, or AECB Silver, the heat balance graph gives you an instant overview of where your building is losing heat, and where you might try next to meet the target. Walls are the biggest chunk? Increase insulation thickness or reduce the conductivity – maybe even have a closer look at your repeating thermal bridging.
What are your pro-tips for getting the best out of Warm’s analysis sheet?


